전송방식#
폼을 전송하는 두 방법
application/x-www-form-urlencodedmultipart/form-data
파일을 전송할 땐, 이진 데이터를 전송해야 되므로, 이 방식 사용 불가 또한, 보통 폼과 파일을 같이 전송하므로, 문자와 바이너리를 동시에 전송해야 함
이 문제를 해결하기 위해서, HTTP는
multipart/form-data방식 제공!
multipart/form-data#
다른 종류의 여러 파일과 폼의 내용을 함께 전송하는 방식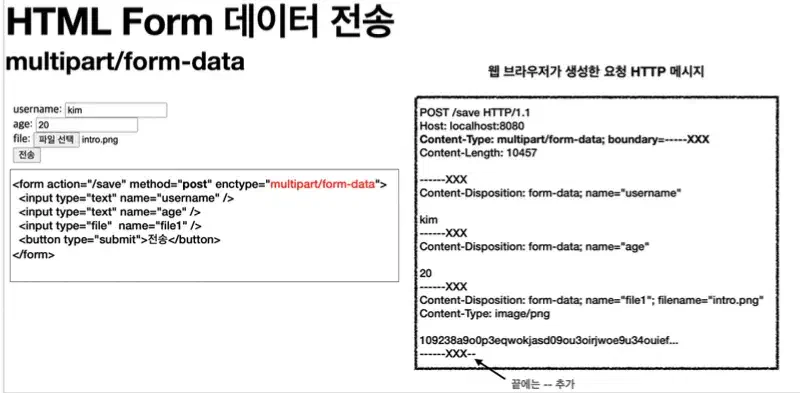
Content-Disposition이라는 항목별 헤더가 있음- 폼의 일반 데이터는 각 항목별로 문자가 전송
- 파일의 경우는 파일이름, Content-type이 추가되고, 이진데이터 전송
서블릿과 파일 업로드#
업로드 사이즈 제한
  spring.servlet.multipart.max-file-size=1MB
spring.servlet.multipart.max-request-size=10MB- 사이즈를 넘으면
SizeLimitExceededException발생
spring.servlet.multipart.enabled 끄기(multipart 처리 안함)
spring.servlet.multipart.enabled=false (default=true)
파일 저장 경로
application.properties
file.dir= {...}
서블릿이 제공하는 part 메서드
- part.getSubmittedFileName()
- part.getInputStream()
- part.write()
스프링의 파일 업로드#
스프링에선
MultipartFile인터페이스로 편리하게 지원
@PostMapping("/upload")
    public String saveFile(@RequestParam String itemName,
                           @RequestParam MultipartFile file,
                           HttpServletRequest request) throws IOException {
        log.info("request={}",request);
        log.info("itemName={}",itemName);
        log.info("multipartFile={}",file);

        if(!file.isEmpty()){
            String fullPath = fileDir + file.getOriginalFilename();
            log.info("file fullpath={}",fullPath);
            file.transferTo(new File(fullPath));
        }
        return "upload-form";
    }
**MultipartFile 주요 메서드 **
file.getOriginalFilename()file.transferTo{...}(파일저장)
다중 파일 업로드
List<MultiPartFile>을 멤버 변수로 가지고 있는 클래스의@ModelAttribute사용 Html<input type="file" multiple="multiple">사용
**이미지 보여주기 **
웹에서 <img> 태그로 이미지를 조회할때, URLResource로 이미지 파일을 읽어서 @ResponseBody로 이미지 바이너리 반환
ex)
@ResponseBody
    @GetMapping("/images/{filename}")
    public Resource downloadImage(@PathVariable String filename) throws MalformedURLException {

        return new UrlResource("file:" + fileStore.getFullPath(filename));
    }
파일 다운받기
@ResponseEntity<Resource> 사용
Content-Disposition헤더가 없으면, 파일의 내용을 그대로 가져와서 보여주기만 한다.
이를 넣어 주어야만 다운로드가 가능하다
 public ResponseEntity<Resource> downloadAttach(@PathVariable Long itemId) throws MalformedURLException {
        Item item = itemRepository.findById(itemId);
        String storeFileName = item.getAttachFile().getStoreFileName();
        String uploadFileName = item.getAttachFile().getUploadFileName();

        UrlResource resource = new UrlResource("file:" + fileStore.getFullPath(storeFileName));
        log.info(fileStore.getFullPath(storeFileName));
        log.info("uploadFileName={}", uploadFileName);

        String encodedUploadFileName = UriUtils.encode(uploadFileName, StandardCharsets.UTF_8);
        String contentDisposition = "attachment; filename=\"" + encodedUploadFileName + "\"";

        return ResponseEntity.ok()
                .header(HttpHeaders.CONTENT_DISPOSITION, contentDisposition)
                .body(resource);
    }